
How To Clean Dog Ears
Cleaning your dog’s ears may not be the most exciting task, but it’s one of the most important parts of routine grooming and overall health care. A clean ear helps prevent infections, reduces discomfort, and keeps your pup’s hearing sharp. Dogs explore the world with their noses and ears, which means dirt, debris, and moisture can easily get trapped inside the ear canal. If left unchecked, these can lead to irritation, itching, or painful infections.
Fortunately, cleaning your dog’s ears is simple when done correctly. With a gentle touch, the right products, and a consistent schedule, you can help your dog stay comfortable and healthy all year long.
Why Cleaning Your Dog’s Ears Matters
Your dog’s ears are more delicate than they look. Unlike human ears, the canine ear canal is long and L-shaped, which makes it easy for moisture and debris to get trapped deep inside. That’s why ear infections are one of the most common health problems seen by veterinarians.
When wax and dirt build up, they create the perfect environment for bacteria and yeast to grow. Dogs that swim often, have allergies, or have floppy ears are even more prone to ear issues. Breeds like Cocker Spaniels, Basset Hounds, Poodles, and Labradoodles often need regular ear cleanings because their ears hold in moisture and have less air circulation.
Keeping your dog’s ears clean doesn’t just make them look better—it helps prevent pain, scratching, odor, and vet bills. A few minutes every week can save your dog a lot of discomfort later on.
How Often Should You Clean Your Dog’s Ears?
How often you clean your dog’s ears depends on their breed, activity level, and environment. Some dogs rarely need ear cleanings, while others require them weekly.
Dogs with upright ears and low wax production may only need cleaning once a month. Breeds with floppy ears or those that love swimming, hiking, or rolling around outdoors might need cleanings every one to two weeks. Dogs with allergies or oily skin may also produce more wax, requiring more frequent maintenance.
You can determine your dog’s ideal cleaning schedule by checking their ears weekly. If the ears look pink, clean, and odor-free, they’re likely fine. If you notice visible wax, dirt, or a mild smell, it’s time for a cleaning. Over-cleaning can irritate the ear canal, so aim for balance—clean only when needed.
Signs Your Dog’s Ears Need Cleaning
It’s easy to spot when your dog’s ears are ready for a cleaning. You might notice your dog shaking their head, scratching excessively, or rubbing their ears against furniture or the floor.
When you inspect the ears, look for brown or yellow wax, dirt, or residue near the opening. A mild earthy or yeasty smell is also a sign of buildup. The skin inside should be light pink—not red, scaly, or inflamed.
If your dog whines when you touch their ears, or if you see discharge, swelling, or blood, skip cleaning and call your veterinarian. These symptoms may indicate infection or ear mites that require medication, not just cleaning.
What You’ll Need To Clean Your Dog’s Ears
Before you start cleaning, make sure you have everything ready. The process goes much smoother when you’re prepared. You’ll need a veterinarian-approved dog ear cleaning solution, cotton balls or gauze pads, a towel, and a few treats.
Always use a cleaning solution made specifically for dogs. Avoid using alcohol, hydrogen peroxide, or vinegar, as these can irritate or dry out the ear canal. Cotton swabs (like Q-tips) should also be avoided because they can push debris deeper inside and even damage your dog’s eardrum.
If you’re not sure which cleaner to choose, consider trusted veterinary-recommended products such as:
- Zymox Ear Cleanser with Bio-Active Enzymes — gentle, enzymatic formula ideal for routine maintenance.
- Virbac Epi-Otic Advanced Ear Cleaner — effective at removing wax and controlling odor.
- Vet’s Best Dog Ear Relief Wash — a natural aloe-based option that soothes and cleans.
Have your dog sit on a towel or non-slip surface, and keep the environment calm. Dogs are sensitive to tone and body language, so staying relaxed will help them feel at ease.
Step-by-Step: How To Clean Dog Ears Safely
Step 1: Get Your Dog Comfortable
Choose a quiet area where your dog feels relaxed. Have treats nearby and speak softly throughout the process. Some dogs prefer sitting, while others do better standing. If your dog is nervous, start by petting them and gently touching their ears before beginning. This helps build trust and reduces anxiety.
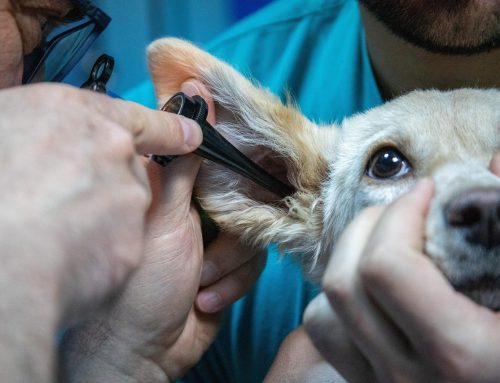
Step 2: Inspect the Ears
Gently lift your dog’s ear flap and look inside. Healthy ears are pale pink and clean. If you see dark debris, pus, redness, or smell a foul odor, stop immediately and contact your veterinarian. Attempting to clean an infected ear can make things worse.
Step 3: Apply the Ear Cleaner
Hold the ear flap upright and carefully squeeze a small amount of the ear cleaning solution into the ear canal. Don’t insert the bottle tip deep into the ear—just enough to allow the cleaner to flow in.
Step 4: Massage the Base of the Ear
Gently massage the base of the ear for about 20 to 30 seconds. You should hear a squishing sound as the cleaner loosens wax and debris. This step is essential—it helps the solution reach the deeper parts of the ear canal where dirt often collects.
Step 5: Let Your Dog Shake
Once you finish massaging, step back and let your dog shake their head. This is a natural and effective way for them to expel the loosened debris. You may want to hold a towel over your dog’s head or do this part outside to avoid getting splashed.
Step 6: Wipe the Outer Ear
After your dog shakes, use a cotton ball or gauze pad to gently wipe away any visible debris or cleaner from the outer ear canal and inner flap. Only clean what you can see—never stick anything deep inside the ear. The inner ear is sensitive and easily injured.
Step 7: Reward and Repeat
Once you’re done with one ear, praise your dog and give them a treat. Then repeat the process on the other ear. Ending on a positive note helps your dog associate ear cleanings with rewards, making future sessions easier.
What Not To Use When Cleaning Dog Ears
It’s tempting to grab whatever household product seems handy, but many can do more harm than good. Avoid alcohol, hydrogen peroxide, or vinegar—they can cause burning or irritation, especially if your dog’s skin is inflamed. Baby wipes and tissues can also leave behind lint and don’t reach deep enough to clean properly.
Always use a veterinarian-approved ear cleaner designed for dogs. These solutions contain ingredients that gently dissolve wax and dry excess moisture without damaging delicate tissue. If you’re unsure which cleaner is best, your vet can recommend one based on your dog’s ear type and sensitivity.
What If Your Dog Hates Ear Cleaning?
Many dogs are nervous about ear cleaning, especially if they’ve had painful infections before. The best approach is patience and positive reinforcement. Start by handling your dog’s ears gently for a few days before cleaning. Give treats and praise for staying calm.
When it’s time to clean, keep sessions short and reward cooperation. If your dog tries to move away, don’t force them—take a break and try again later. You can also have another person gently hold your dog or distract them with a lick mat or frozen treat.
Over time, your dog will learn that ear cleaning isn’t something to fear—it’s just another way you care for them.
When To Call the Vet
Sometimes, ear issues require professional attention. If your dog’s ears are red, swollen, or producing thick yellow or brown discharge, don’t attempt to clean them yourself. These are signs of infection or ear mites, which need prescription medication.
Other symptoms that require a vet visit include constant head shaking, tilting, pawing at the ears, loss of balance, or hearing changes. Your veterinarian may perform an ear swab or culture to identify the cause and prescribe the right treatment.
Never use leftover ear drops or antibiotics without veterinary guidance—what works for one type of infection could make another worse.
How To Prevent Ear Problems
Prevention starts with routine care. Check your dog’s ears weekly for dirt or odor. After swimming or bathing, gently dry their ears with a soft towel and use a drying solution if recommended by your vet.
Feed a balanced diet and manage allergies since chronic itching and inflammation often begin with food or environmental sensitivities. Keeping hair trimmed around the ear openings can also improve air flow, especially in long-haired breeds.
Most importantly, make ear cleaning part of your grooming routine, just like brushing and nail trimming. Consistency keeps problems from developing in the first place.
FAQs About Cleaning Dog Ears
How often should I clean my dog’s ears?
Most dogs need ear cleaning about once a month, but floppy-eared breeds or dogs that swim often may need weekly cleanings. Always check your dog’s ears before deciding—clean only when there’s visible dirt, wax, or odor.
What’s the best ear cleaner for dogs?
Veterinarian-approved solutions such as Zymox Ear Cleanser, Virbac Epi-Otic, or Vet’s Best Dog Ear Relief Wash are safe and effective. Avoid products with alcohol or harsh chemicals.
Can I use Q-tips to clean my dog’s ears?
No. Cotton swabs can push wax deeper into the ear canal and risk puncturing the eardrum. Use cotton balls or gauze pads to wipe only what you can see.
Why do my dog’s ears smell bad?
A foul odor can indicate infection, yeast buildup, or trapped moisture. Don’t attempt to clean smelly ears on your own—schedule a vet visit for proper diagnosis and treatment.
Can I clean my dog’s ears after swimming?
Yes, and it’s a great habit to form. Moisture left inside the ear canal encourages bacterial growth. Use a drying solution after swimming to remove excess water and prevent infections.
What should I do if my dog resists ear cleaning?
Try desensitization. Gently touch and reward your dog for letting you handle their ears over several days. Keep sessions short, use calm praise, and end with a treat. Eventually, your dog will associate the process with something positive.
Can I use homemade ear cleaners for my dog?
Homemade recipes are risky. Vinegar, alcohol, or peroxide can cause stinging and irritation. It’s best to stick with products made specifically for dogs or those recommended by your vet.
My dog keeps shaking their head after cleaning—is that normal?
Yes, mild head shaking after cleaning is normal as your dog removes excess liquid. However, if the shaking continues for hours or days, or your dog seems in pain, call your vet—it may indicate irritation or infection.
Do floppy-eared dogs need more frequent ear cleaning?
Absolutely. Breeds with long, hanging ears trap more moisture and debris, making them prone to yeast infections. Regular cleaning helps keep the ear canal dry and healthy.
What are the signs of an ear infection in dogs?
Common signs include redness, swelling, strong odor, dark discharge, head shaking, and pawing at the ears. If you notice any of these, see your veterinarian as soon as possible. Early treatment prevents complications and discomfort.
The Bottom Line: Regular Ear Cleaning Keeps Your Dog Healthy and Happy
Cleaning your dog’s ears might seem intimidating at first, but it’s a quick and easy habit that goes a long way toward keeping your pup healthy. By using gentle techniques, safe cleaners, and plenty of patience, you can help prevent infections and discomfort while strengthening your bond.
Whether your dog has floppy ears, pointy ears, or something in between, consistent care and attention will ensure their ears stay clean, comfortable, and infection-free. Regular ear cleaning is more than just grooming—it’s an act of love that helps your best friend live a happier, healthier life.


